Using Timers To Allow Values to Stabilise
In some cases, values can take a while to stabilise after an abrupt change.
A quick and easy way to ignore some of these instabilities is to use a timer to create a window of time where your analytic will ignore issues.
For example, let's say we are making a pivot analytic where we want to ignore the 10 seconds after we move between making product A and product B.
We could do the following…
Determine if a Change has Happened
Before we can start a timer, we first need to know if we should start a timer.
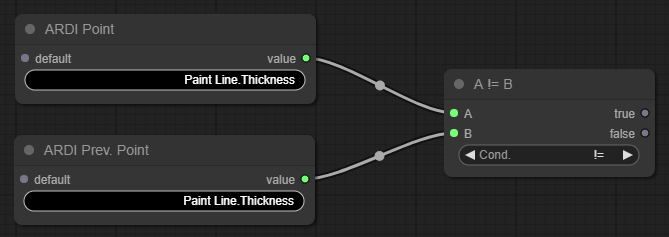
To see if there's been a change of any kind in a property, we can compare the current value to the previous value - if they are different, we should start the count-down.
Data From Production/Scheduling/Recipe Systems
The example above uses a ARDI Point and a Previous Point node and compares the values with a Condition.
Data From Sensors
The previous example works fine properties that move in fixed, sudden movements. But for analogue sensor values - which constantly drift very slightly up and down - you might want to only set your timer if you see a large-enough change.
This is a similar solution to the first one, but it adds a Subtraction node and an Absolute Value node to make sure that the difference between the current and previous value is more than 1.5 units.
Introducing the Timer
Now that we've determined that a change has taken place, we need to start our 10-second timer. This is done with the Timer node.
At it's most basic, the finished output will become true when the number of seconds has elapsed.
The counting output will be true when the timer is running but hasn't yet finished.
By setting the activation to latched, we make sure that even a momentary difference will start the timer, rather than the difference needing to last the full 10 seconds.
By setting the reset to auto, we make sure that the timer will reset by itself once it finishes.
So in this case, we are…
- Starting the timer the moment we see that the thickness has changed,
- The timer begins counting down, setting the Counting output to True,
- Counting remains true for the next 10 seconds
- At the end of the 10 seconds, the timer resets and is ready to run again.
This means that our report will ignore any values in the 10 seconds after a product thickness change.


